SSL/Certificate Pinning — iOS 14.0 Never easy before
We are not going to discuss, What is SSL Pinning?
In case, you want to know what the hack is read more on owasp.org and indusface.com.
In short, this is a technique designed to make sure you receive a response directly from your trusted servers.
Types of SSL Certificate Pinning Method
- Pin the certificate: Download the server’s certificate and bundle them in to the app. At runtime compare server certificate to one in the bundle.
- Pin the public key: Retrieve the public key of certificate and store it in the code as a string. At runtime compare server certificate’s public key to hard coded string in the bundle.
How to Perform SSL Pinning in iOS Apps?
👉 👉 👉 Before iOS 14.0
There are many popular options to perform SSL pining in iOS. These are- URLSession, AlamoFire, AFNetworking, TrustKit. We can implement Certificate pinning as well as public-key pining using URLSession,AlamoFire, AFNetworking and TrustKit.
Coding
func urlSession(_ session: URLSession, didReceive challenge: URLAuthenticationChallenge, completionHandler: @escaping (URLSession.AuthChallengeDisposition, URLCredential?) -> Void) {
  //write your compare public key or certificate here.
}
👉 👉 👉 After iOS 14.0

Apple have added a new Property List Key called NSPinnedDomains in NSAppTransportSecurity that holds a collection of certificate that App Transport Security expects when connecting to named domains.
The value for this optional key is a dictionary with keys that specify the domain names for which you want to set the expected certificates. The value for each domain name key is another dictionary that configures the expected certificates for that domain.
NSPinnedDomains : Dictionary {
  <domain-name-string> : Dictionary {
       NSIncludesSubdomains : Boolean
       NSPinnedCAIdentities : Array
       NSPinnedLeafIdentities : Array
  }
}
In Info.plist will look like this if you add the certificate pinning feautre.

Below is the key and description about the each key,
- NSAppTransportSecurity = App Transport Security Settings
This key holds configuration for a networking feature called App Transport Security (ATS).
- NSPinnedDomains
A collection of domain names which your application want to connect. In this blog I am using a free REST API domain called reqres.in
- NSIncluedesSubdomains
You can also extend the pinning to cover subdomains by setting the value for the NSIncludesSubdomains key to YES.
- NSPinnedCAIdentities
A list of allowed Intermediate Certificate Authority (CA) certificates for a given domain name. (In the above example, I just have used NSPinnedCAIdentities)
- NSPinnedLeafIdentities
A list of allowed leaf certificates for a given domain name.
A value that represents the base64 encoded SHA-256 digest of an X.509 certificate’s.
You can see in the above info.plist I have used NSPinnedCAIdentities.
Now the question rise, should we use NSPinnedCAIdentities or NSPinnedLeafIdentities or both ?
What is this (Intermediate) CA, Leaf identities in the certificate chain? and How to find out the chain of trust for your server?
Option 1: In Browser you can simply click on the lock in the address bar and then click on show certificate.

Option 2: Terminal and use openssl command.
openssl s_client -showcerts -servername reqres.in -connect reqres.in:443Scroll to top and you will see the result as,
depth=2 C = IE, O = Baltimore, OU = CyberTrust, CN = Baltimore CyberTrust Root
verify return:1
depth=1 C = US, O = "Cloudflare, Inc.", CN = Cloudflare Inc ECC CA-3
verify return:1
depth=0 C = US, ST = California, L = San Francisco, O = "Cloudflare, Inc.", CN = sni.cloudflaressl.com
The certificate chain has a depth of 3.
🔖 depth 0: Leaf certificate (sni.cloudflaressl.com)
🔖 depth 1: Intermediate CA certificate (Cloudflare Inc ECC CA-3)
🔖 depth 2: Root certificate (Baltimore CyberTrust Root)
You can download the certificate on desktop by drag and drop by holding the certificate icon on the above images in-front of ‘Cloudflare Inc ECC CA-3’ or ‘sni.cloudflaressl.com’. Or your server side team already have it with them which they can share with you.
NOTE: You can download and use depth 2 Root certificate also for pinning. But i don’t feel it's a right choice.
All OS’s has Trust store which holds trusted root certificates that are preinstalled for us iOS, iPadOS, macOS, tvOS, and watchOS.
You can see “(Baltimore CyberTrust Root)” in the list. So pinning root certificate might not help that much.

Then convert .cer/.der file to .pem
openssl x509 -inform der -in Cloudflare\ Inc\ ECC\ CA-3.cer -out Cloudflare_Inc_ECC_CA-3_ItermediateCert.pemWe need SPKI-SHA256-BASE64 value, you can calculate that with openssl command,
cat Cloudflare_Inc_ECC_CA-3_ItermediateCert.pem | openssl x509 -inform pem -noout -outform pem -pubkey | openssl pkey -pubin -inform pem -outform der | openssl dgst -sha256 -binary | openssl enc -base64This will give the following result:
FEzVOUp4dF3gI0ZVPRJhFbSJVXR+uQmMH65xhs1glH4=It is our SPKI-SHA256-BASE64 for CA certificate = depth 1
We can use above steps to get the SPKI-SHA256-BASE64 for leaf certificate = depth 0. Just use leaf .cer/.der and follow the same commands.
openssl x509 -inform der -in sni.cloudflaressl.com.cer -out sni.cloudflaressl.com.pemcat sni.cloudflaressl.com.pem | openssl x509 -inform perm -noout -outform pem -pubkey | openssl pkey -pubin -inform pem -outform der | openssl dgst -sha256 -binary | openssl enc -base64// OUTPUT - SPI-SHI256-BASE64
BiDE0on+Zn+0iwrca1dMeZlvH0UqhQik2Bl6btjkzhM=
Which one we should use Intermediate CA or Leaf?
You can use one of them or both of them as it has its own pros and cons as mentioned below.
NSPinnedLeafIdentitiestoInfo.plist
Pros: Simple
Cons: App becomes unusable once Certificate/Private Key is renewed (typically after a few months or 1 year)NSPinnedCAIdentitiestoInfo.plist
Pros: Simple. No failure on Leaf Certificate renewal because Intermediate CA or Root CAs are pinned instead (expiration dates are 5+/10+/ 20+ years)
Everything is set…
You can write and run a code start requesting for data from reqres.in server. APIs,
https://reqres.in/api/users?page=2
You will receive a response from the server. Nothing has changed. Without all this steps also your code where working. :) :)
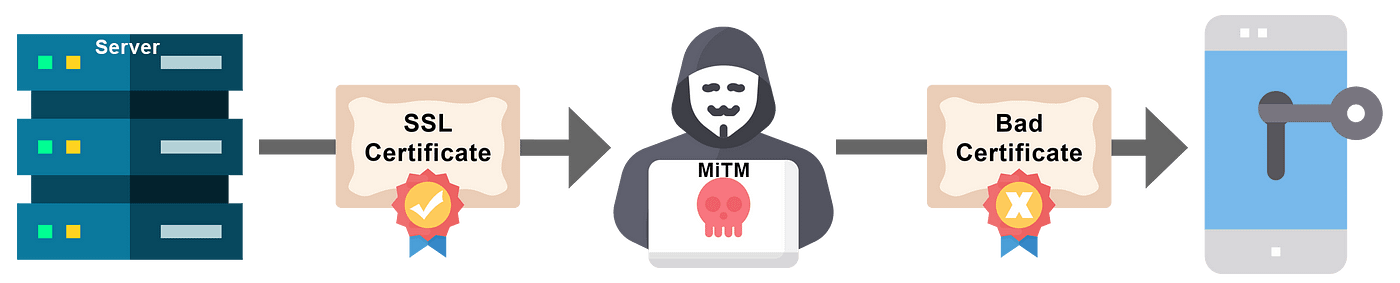
How to test the Certificate Pinning is working?
To test the pinning you need to use a Proxy tool like Charles Proxy, Proxyman, etc.
Before running an iOS application,
Step 0: Launch your proxy application in my case Charles Proxy.
Step 1: Enable/Start SSL Proxying

NOTE : You can enable proxying for specific domain also. For details watch the below video
Remember to re-run/delete & run the application after disabling/enabling the SSL proxy.
Some time it doesn’t reflect instantly.

Remember:
Info.plist certificate pinning in iOS application can be bypassed with multiple approaches and save guard against those too. :)
Wants to know How? read,
Problem Faced:
When I quit the Charles/Proxy tool my network/internet stopped working. Interent was only working when Charles/Proxy tool was running.
Solution:
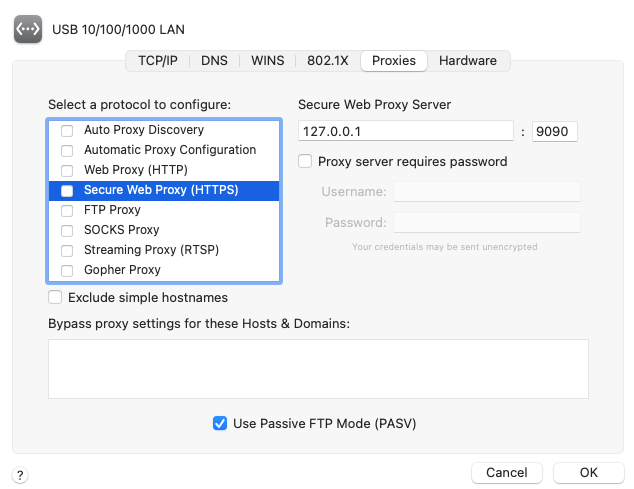
Go to -> System Preferences -> Network -> Advance -> Proxies
Uncheck the Secure Web Proxy (HTTPS) -> Click OK and Apply
Do this for LAN and WiFi both.